As many of my visitors were curious about the little flower in Audrey’s eye chip, I decided to make this little tutorial, explaining very quickly step-by-step how I did it. Doing the little flower has no secret, all you need is having the correct materials.
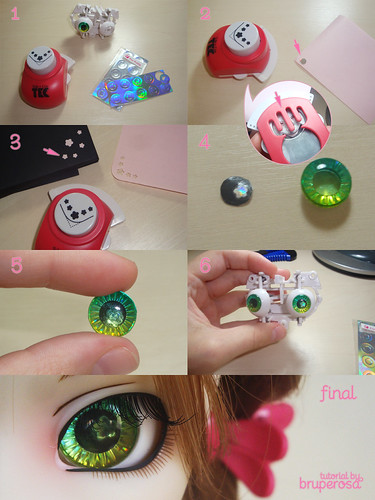
1- Materials: Corner paper punch (scrapbook tool), Laser Paper (this one is Cool Cat’s), Double-faced (transparent) tape, scissors and black paper.
2- I glued the inner circle from a laser paper on the corner of a sheet, so I could punch it. After that I positioned the laser paper (looking under the paper punch) so it stayed centered in the flower detail (punch) I chose.
3- After that, I punched the paper, and took the cut flower. I’ve chosen one of the smallest, so it wouldn’t become too shiny in the eye.
4- Instead of painting the bottom of the eye chip black, I decided to cut a black paper and glue the flower on it. After that, I’ve used the double-faced tape to fix it in the bottom of the eye chip.
5- Then, all I did was position it where I wanted and it was ready!
6- The last, but not the least, thing to do was put the eye chip back in the mechanism (:
*
Como o pessoal demonstrou curiosidade sobre a flor no olho da Audrey, resolvi fazer um mini-tutorial bem rápidinho explicando passo-a-passo como eu fiz. Fazer a florzinha não tem nenhum segredo, basta ter os materiais 🙂
1- Materiais necessários: Furador de cantoneira (ferramenta de ScrapBook), Laser Paper (esse é da Cool Cat), fita Dupla Face transparente, tesoura (sem ponta, crianças) e papel preto.
2- Eu colei o círculo interior de um laser paper na ponta de um papel qualquer para que pudesse fazer o furo e então posicionei o laser paper (olhando embaixo do furador) de forma que ele ficou centralizado no detalhe (furinho) de flor escolhido.
3- Após isso, eu peguei a flor cortada. Eu tinha escolhido uma das menores para não ficar brilhoso demais no olho.
4- Ao invés de pintar o fundo do eyechip de preto, eu decidi recortar um papel preto e colar a flor de laser paper nele. Depois disso usei uma fita dulpa face transparente para fixar no fundo do eyechip.
5- Então eu posicionei ele na parte que eu mais gostei e pronto!
6- Depois, foi só colocar o eyechip no mecanismo 🙂
Posted by BruPerosa || Hello Sweetie on 2010-07-17 21:04:49
Tagged: , flower , detail , eye chip , tutorial , laser paper , pullip , custom