


The Headshot 3 plugin was another evolutionary leap in character creation with the addition of improved Image facial mapping capabilities. For those of you that haven’t had the pleasure of using Headshot 3 yet the mapping is not complex at all so don’t let the terminology scare you off.
We will cover in this article how to use the control points and the curve handles that come with those points to shape the head mesh to fine tune the image to mesh process. We can use up three images: Front Face, Side Face and Body including custom body images or the standard male and female bodies we use on a regular basis. The AI image generator in the plugin is ready to create just such images based on your prompt at the press of a button for unique characters.
Two is Better Than One
When it comes to the image to face feature the front and side image is the preferred method instead of just a front image. Keep in mind that the FRONT IMAGE controls items like head height while the side image controls head depth or more precisely the item you are working with like the eyes, nose, head outline and so on.
The side refinement tool has more control by giving us control points to place in strategic areas like Character Creator has used in the past and curve handles on those points to control the surface curve between the control points.
NOTE: Reallusion points out that the control points are more important and should receive more attention than the curves as the control points form the mesh while the green curves form the surface between the control points.
To be honest I was focusing more on the curves and not paying enough attention to the proper placement of the points. They don’t have to be perfect, but they do need to be as close as you can get them to the head shape. Some quick experimentation will show you what works best.
Front View Only
Using just a front view will work just fine, but if you want more control use the Front and Side view with separate images for both as this will activate the side view control points for proper placement. If you are creating background or crowd characters, then this is not that important but if you are trying to recreate a concept or historical character this will give you more control points to shape the characters’ head.
Front and Side View
This is the preferred method if you have a side view available. It needs to be 90-degree side view or as close as possible otherwise we have to make up for it by moving the controls relative to the mesh outline on front and back as discussed later in this article. This is also demonstrated in the recent Reallusion tutorial embedded in this article.
Again, the new AI image generation feature can generate images for us, and we can regenerate if needed or adapt the control points. This added bonus allows us to stay within the application instead of going to an outside generation service for headshots. As with most Character Creator tools, this simplifies the process and keeps us in app negating the necessity of running multiple apps.
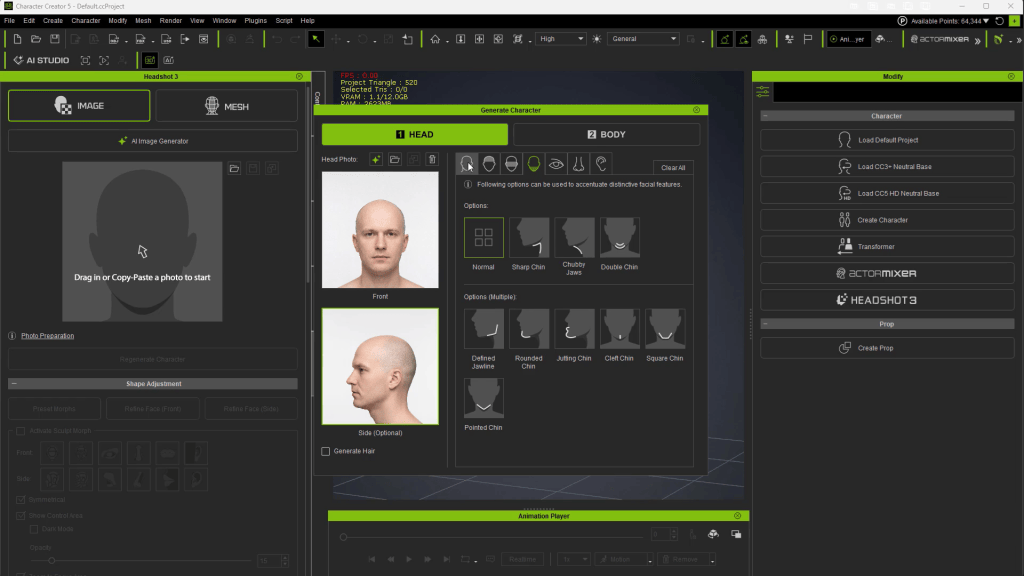
The Side View
Now we have control over the sides of the head, it provides us with more flexibility in matching the character.
While using the Side image gives us more control points it can collapse the forehead if used improperly as the side view sets the forehead (and head) depth in general. If you place one particular control point too high on the head the forehead depth or volume will collapse and curve awkwardly inward, then back out.
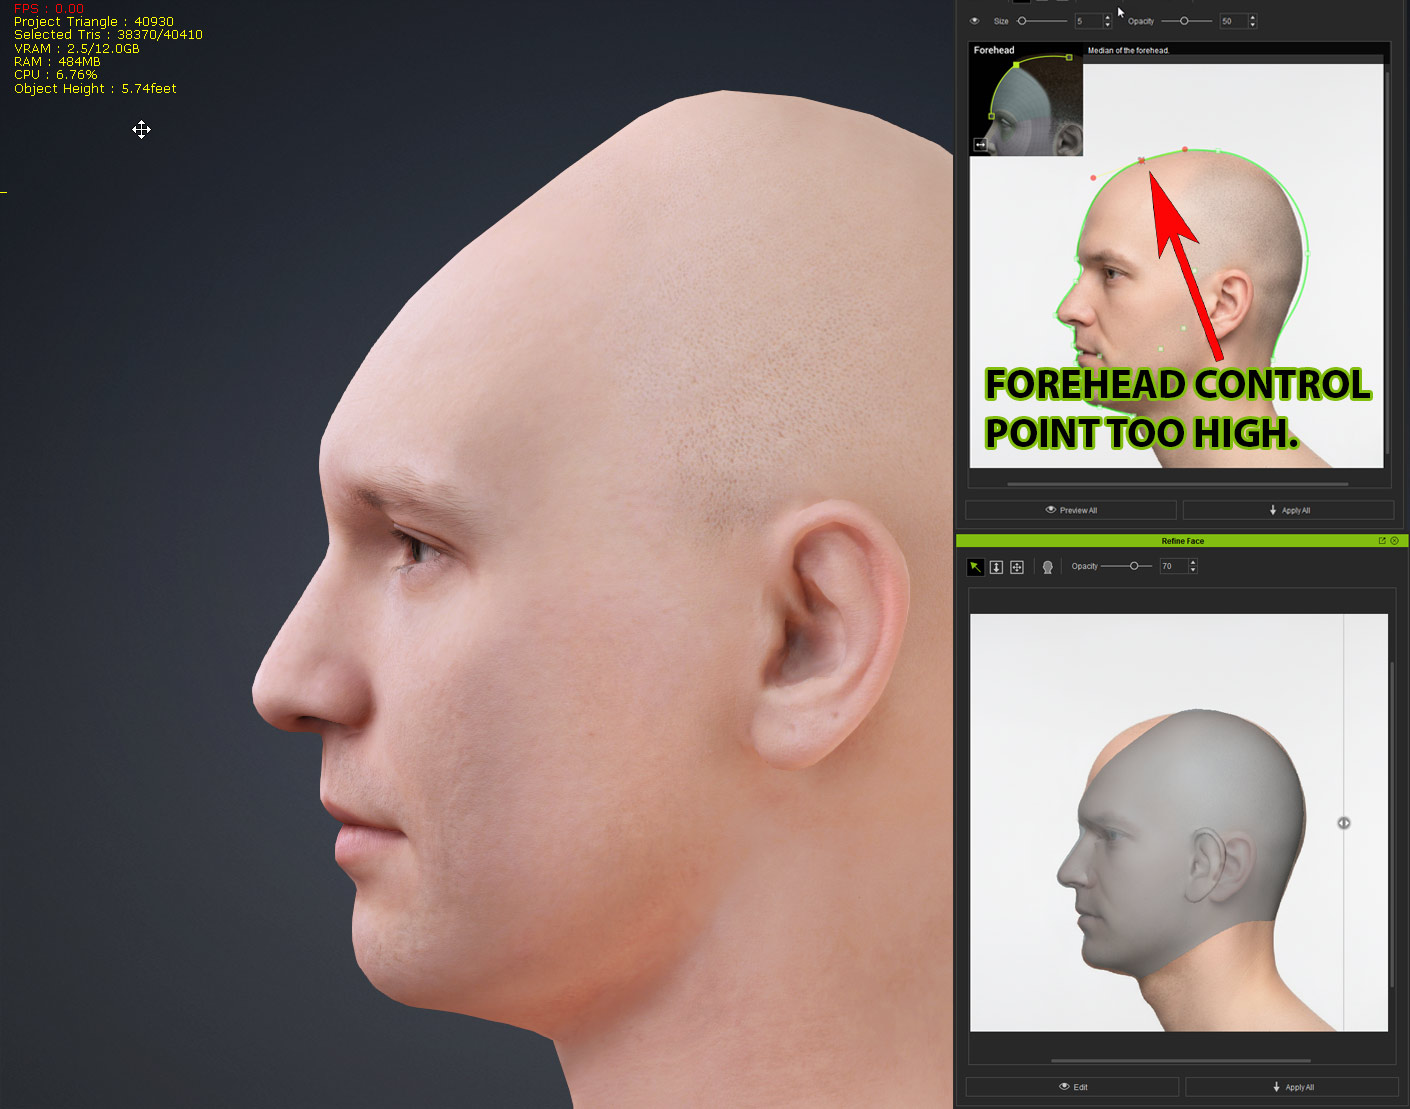
To avoid this the top front control point needs to be placed at the hairline or where the hairline should be. This will ensure enough volume to keep the forehead from distorting when shaped from the side. After this we can then fine tune the forehead volume if needed.
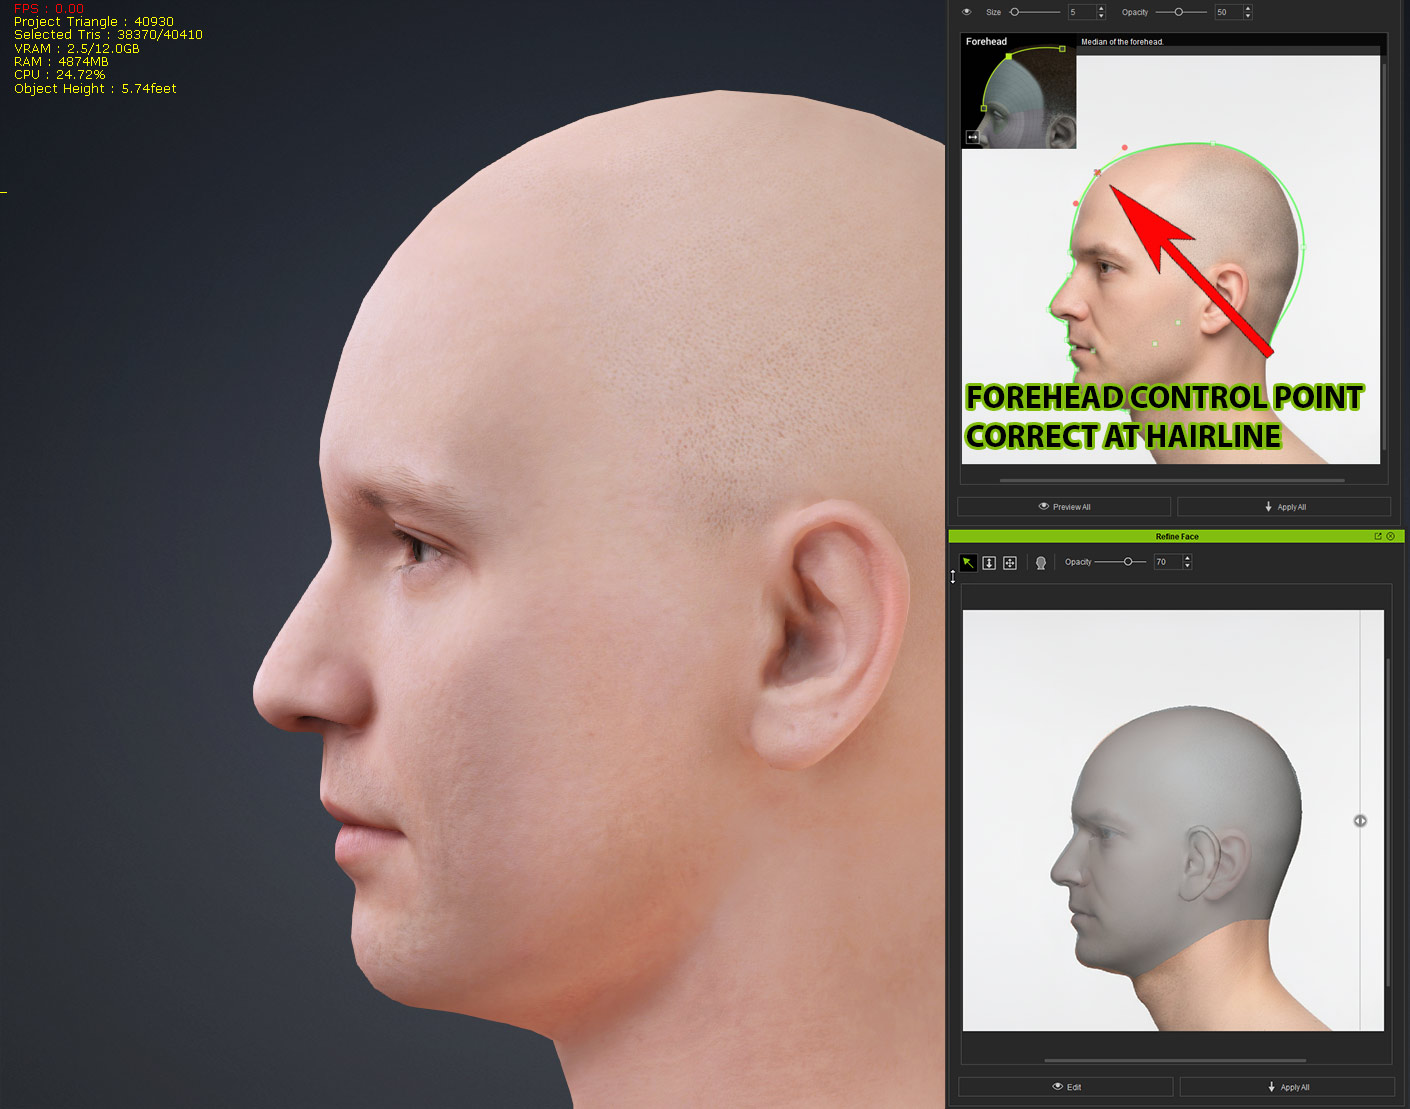
The video below demonstrates this and how to correct it and the Reallusion Tutorial further down in this article goes into more detail.
The Profile Depth Slider
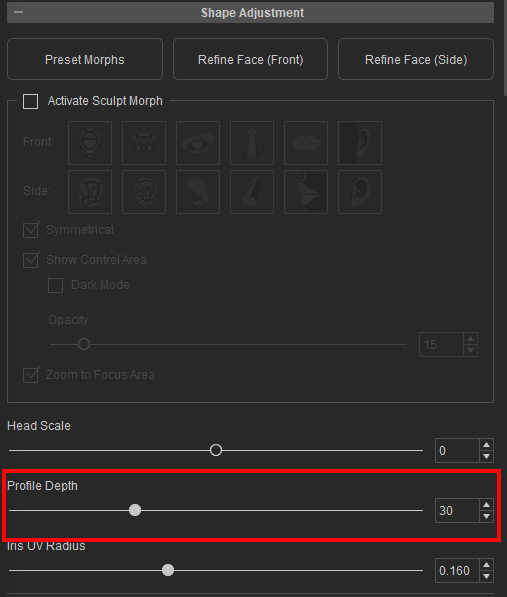
To get a character all we need at minimum is a forward headshot. This sets the face features and other landmarks. Due to it being a forward view the face can be a bit flatter than normal so we can use the Profile Depth slider to project face outward more or draw it inward. If the nose seems a bit flat, then the slider will extend the nose along with all the other facial features adding more depth.
The same thing can happen with using both front and side as the front image still determines the height just like using a single front image with no side image.
Control Point Placement
This bears going over again as the control points are the most important part of the refinement process. The control points set the boundaries of the mesh while the curves fill in the mesh between boundaries so to make substantial changes you must move the control points not the curve control handle.


It might also be necessary to move the points outside of the current mesh boundary to get a finer adjustment. This is why the preview option is so important before committing to the process. What you see on the preview is the actual outcome regardless of what the spline curves show on the adjustment panel. All of this is covered in the tutorial below from Reallusion, my tutorial earlier, as well as in the manual sections for Control Point Placement Guide – Front Face and Side Face.
A Less-Than-Optimal Side View
If you are using a side view that is not exactly 90 degrees, then it can lead to distortion of the head mesh. The Reallusion tutorial below addresses this issue at the 4:50 mark. This explains how to use the refinement tool to solve this problem by forcing a better alignment with the placement of the control points.
If we try to use a less than 90-degree side view the depth of the head will appear narrower and if we do not adjust for it as shown in the video, then skull compression can happen reducing the distance between the front and back of the head creating a less than desirable skull shape.
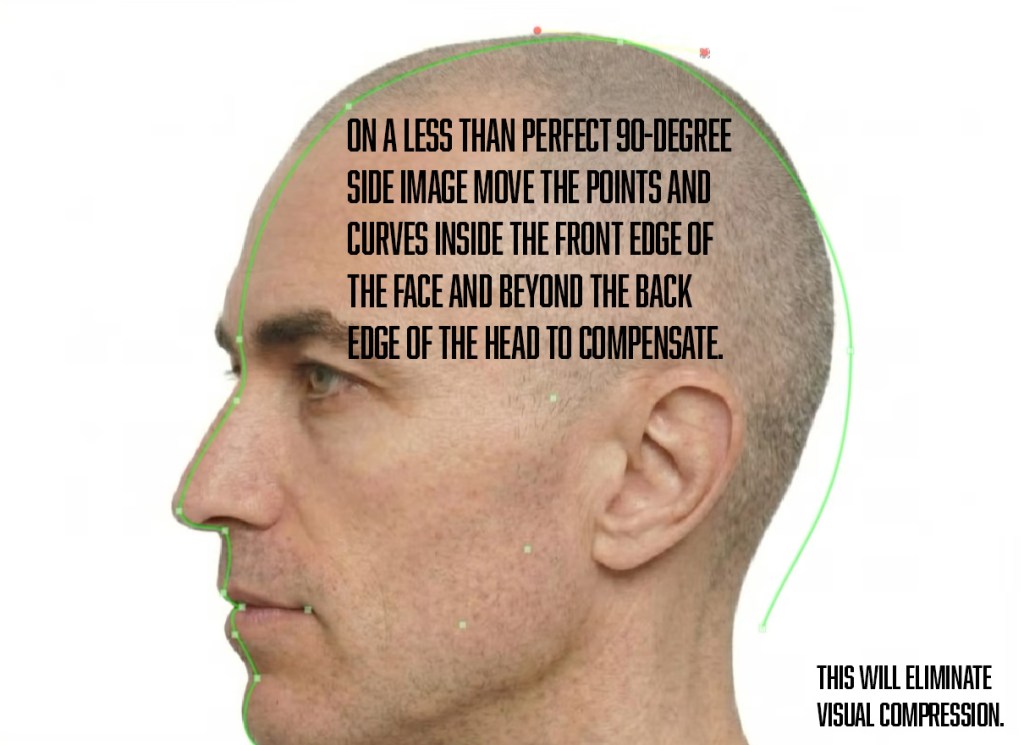
The video tutorial below from Reallusion explains all of this and demonstrates how to compensate for a less-than-optimal side view image ensuring your characters look like YOUR characters not just a close semblance of them.
Aligning the Ears and Setting Eye Depth
We are not confined to using the refinement tools as we can also use the morph sliders to deal with issues like aligning the ears and eye depth. AI can have difficulty in determining the eye depth from a frontal image, so slider adjustment is necessary. Same with lining up the ears from front to back of the head as this can be done with a slider also.
Don’t Forget the Sculpting Tools Too!
Not only does Headshot 3 retain the original sculpting tools if needed there are also additional improvements to the visual sculpting areas for more fine control. In Headshot 3 I suspect the sculpting tools will be used less and less as Character Creator is taking on more of the load with the AI Image to Head tool than ever before. Learn more from the tutorial below, as well as the manual sections for Sculpt Morph Design – Front and Side.
Summary
The main thing to remember if you get a distorted forehead mesh is to go back and place the affected control point closer to the proper position like the area of the hairline in this example. Since the side view only works with depth and not height you must use the front view refinement window to change things like the top of the head height demonstrated in this article and tutorials.
Once again Reallusion provides a tool that can be as simple or as complex as you need it to be. Generate or load a front headshot and you can get a good character but if you use front and side images you will have a lot more controls points to work with and achieve a much more desirable character that can withstand the scrutiny of closes-ups and near camera work.

MD McCallum – WarLord
Digital Artist MD “Mike” McCallum, aka WarLord, is a longtime iClone user. Having authored free tutorials for iClone in its early years and selected to write the iClone Beginners Guide from Packt Publishing in 2011, he was fortunate enough to meet and exchange tricks and tips with users from all over the world and loves to share this information with other users. He has authored hundreds of articles on iClone and digital art in general while reviewing some of the most popular software and hardware in the world. He has been published in many of the leading 3D online and print magazines while staying true to his biggest passion, 3D animation. For more information click here.